Mario Vitalini discusses how underwater photographers can make the most of their ‘golden hour’ – usually referred to as ‘dappled light’
Photography is all about light and how we ‘paint’ with it. For me, one of the most-striking forms of ambient light you can find in underwater photography is dappled light. Land photographers talk about the ‘golden hour’, a time for shooting pics early in the morning or at dusk, when the sun sits low in the horizon and creates a soft, alluring light with a beautiful warm tint. In underwater photography we have our own golden hour, but we tend to refer to it as ‘dappled light’. At sunrise or sunset, the sun’s rays hit the water’s surface at an acute angle. Most beams are reflected by the surface. However, a small portion penetrate through, creating visible sunbeams and striking shafts of light you can photograph. This is dappled light.
Finding The Sunbeams
There are a few key elements you will need to plan for if you want to capture dappled light in your images. Firstly, timing is essential. To achieve a strong image, it is imperative that you are in the water at the right time. The sun in the tropics sets incredibly quickly, so you will only have a few minutes in which to capture the light shafts. Try to dive within an hour of either the sunset or the sunrise, otherwise the sun will be too high in the sky and the rays will hit the surface at a greater angle, or will be too low.
Secondly, surface conditions are very important. Be realistic about your chances of capturing dappled light. You don’t want a very choppy surface because that will reflect almost all the light. Calmer water creates stronger sunbeams. But you don’t want it to be perfectly still either. In my experience, you get the best results when there are a few small ripples on the surface. The small waves on the surface disrupt and split the sunbeams creating a beautiful effect.
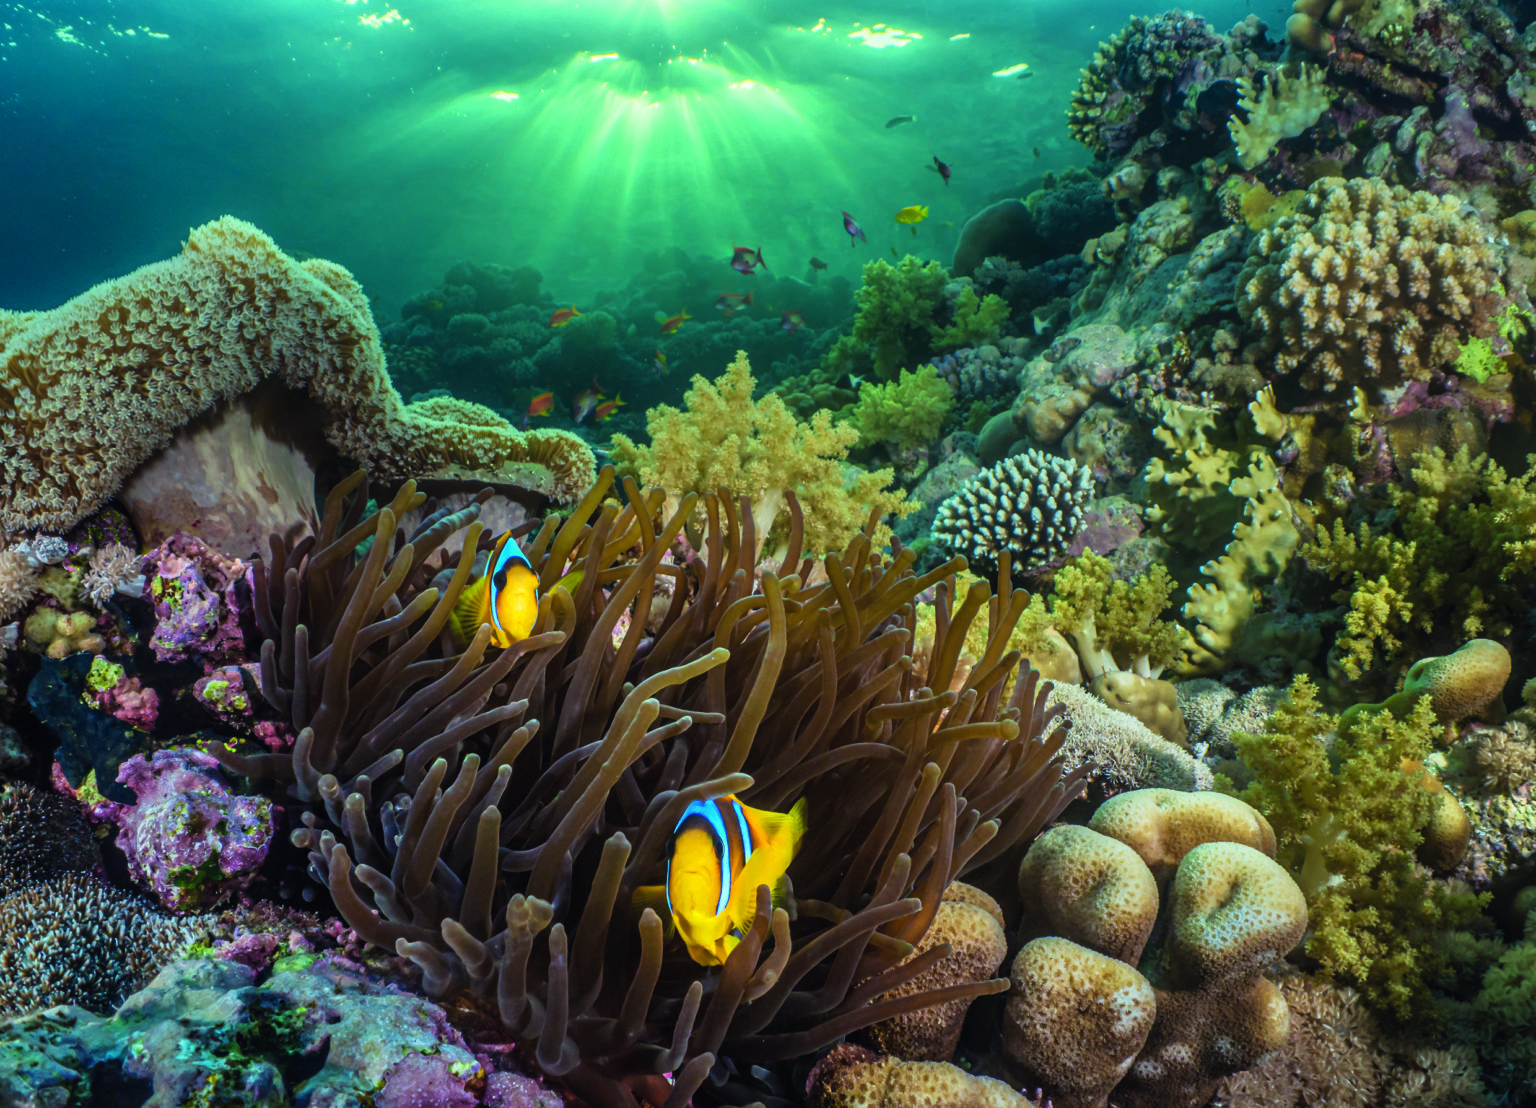
Dive site selection is also essential. A deep dive site is no good. Pick instead a shallow reef, preferably if it almost reaches the surface. Ideally you want to be familiar with the area you intend to photograph, or at least try to dive it beforehand. Think foreground. You can get the most-perfect sunbeams in your shot, but if there is nothing in the foreground that catches our attention, your picture will be too simple and boring. Always look for an interesting subject to place close to the camera – it can be a nice coral formation, a fish or your dive buddy. The ‘what’ is not necessarily that critical, but you need something.
Lastly, depth is essential. Dappled light works very well at very shallow depths, and I have had the best results in less than 2m. If you end up deeper you will struggle to get striking sunbeams. Either you are too deep to actually see the beams, or you have to shoot upwards at an angle that is too steep.
Clearly you need to plan ahead a bit for these kind of shots. When diving reefs that I know are very shallow and have potential for dappled light shots, I aim to finish my dive when the sun position is at its best. Use the first part of the dive to locate the best spots on the reef and spend the last part of the dive in that area to be ready for the right moment. Position yourself in the right place. You will have to be on ‘the dark side of the reef’ because you will need to shoot into the sun in order to see the shafts of light. Ideally you want to shoot almost horizontally or fractionally upwards to avoid overexposing the background.
Lens Selection And settings
One of the characteristics of dappled light is the beautiful warm tint the light exhibits. However, when using a macro lens, the light tends to lose this quality. A wide-angle lens is ideal for dappled light. A fisheye lens would be my preferred choice as long as I can get very close to the element I’m placing in the foreground. This will allow me to fill the frame with it as well as light it properly.
As I have said many times, make sure you expose for the background. Point the camera to the surface, where the sunbeams are forming, and take test shots adjusting the shutter speed and aperture until you are happy with the way the image looks in your LCD. In most cases, you will get a relatively fast shutter speed and a mid-range aperture (around 1/60th F8).
Be prepared to change the settings as the sun goes down, because the light will be disappearing rapidly. Decreasing the shutter speed or increasing the ISO will help you compensate for the rapidly diminishing light. This is a type of shot that requires you to work quickly and adapt until the conditions mean you have to stop.
Lighting
Shooting into the sun means you will be shooting the dark side of the reef and the foreground will be very dark, almost black. Some sort of artificial lighting is essential to light any subject placed in front of the camera. Keep your strobes on either side of your dome port, and position for wide angle. How high or low you position them on the vertical will depend a bit on how high or low your subject is in the foreground. And don’t forget to pull your strobes behind the front plane of the dome port to avoid backscatter.
Loads of people love to dive at dusk, and many divers talk about the different critters they can see at that time of the day. For me it is not the animals, but the light that makes diving at dusk a great experience as a photographer. Next time you are in the water and the sun is setting, get to the shallows, face the sun and get ready to take dappled light shots, where the light is the real star of the picture.


A diver lining up a dappled light photo. In order to get the best results, he’s keeping a shallow depth and pointing the camera into the sun
For dedicated photography trips and workshops, check out: The Scuba Travel Website.
Photographs by Mario Vitalini