Okay folks, this time, I’m going to be examining a technique that I’ve shown many examples of before, and it’s a trick that when I show people how to do it on my trips and workshops, they seem to love and it brings a sense of fun to the whole proceedings of what can sometimes be the quite dry(sic) topic of exposure control within underwater photography.
I also find that because you’re having to push the boundaries of the exposure envelope, and wrangling the trio of flash output, shutter speed and aperture, it will give you a better understanding of the whole subject of the exposure triangle, which is really necessary to learn fully in getting to grips and master underwater photography.
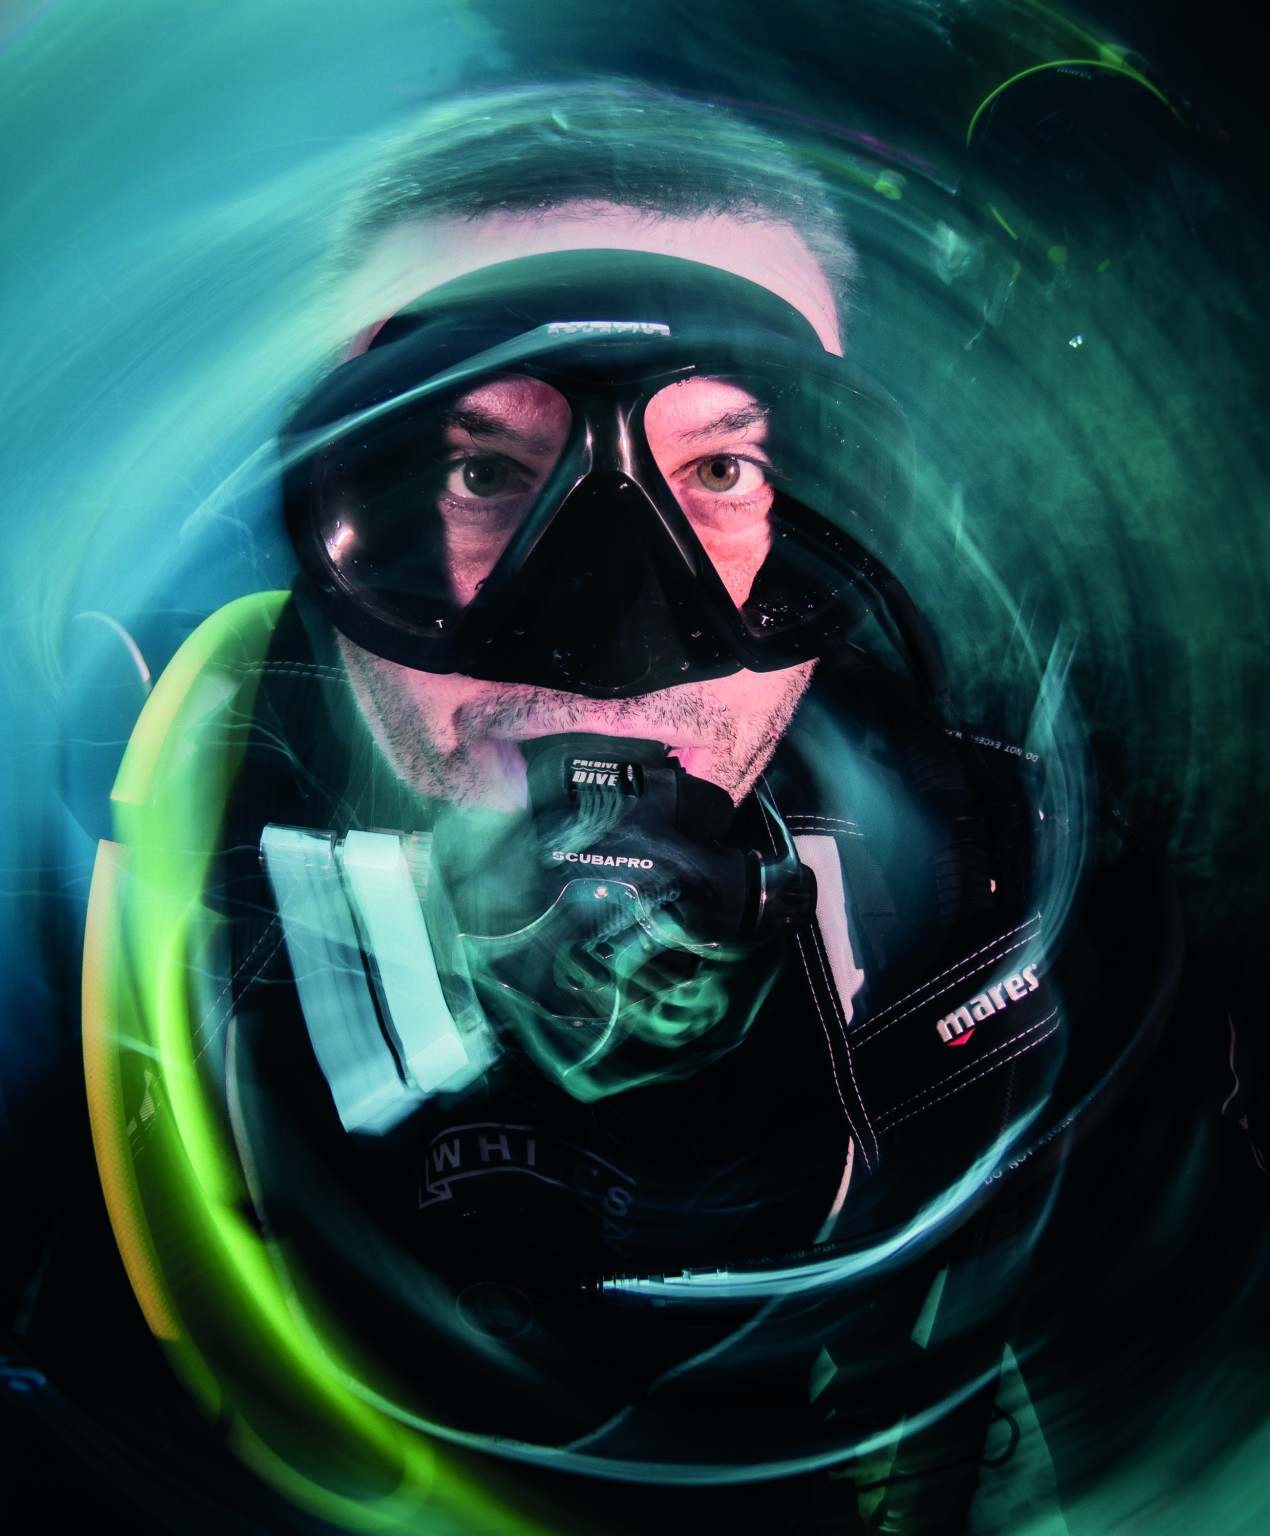
So, what trick are we going to reveal then? The spin shot or twirl, and its associated motion blur cousins that will allow you to inject a dynamic sense of speed into your shots. And it is the most fun way that I know in getting people more familiar and involved with the whole topic of the exposure triangle.
Exposure Triangle?
Before we dive into the intricacies of pulling off a successful spin shot, it’s worth having a little peek at the rules that underpin its workings, and this is the aforementioned exposure triangle.
This is simply the name given to the three mainstays of controlling your camera in manual mode, and this is your Aperture, your ISO, and the most-important control for this technique and that’s your Shutter Speed.

I’m not going to go into a full-blown account of the exposure triangle, but it really is something worth learning to help you understand all photography, underwater or otherwise.
For now though it’s sufficient to grasp that if you change any one of these settings it will directly affect the other two settings. And balancing these changes are what allows you total control of the shot in hand.
Learning to use your camera manually is the real secret to all photography, and even though digital cameras have gone through huge changes and can do all sorts of things automatically these days, you still need to learn this fundamental stuff to truly master your camera and get the results you want.
The good news is that it really is easier than it seems, in fact it’s easier than learning to dive, and I can usually get people up to speed shooting using the exposure triangle in only a couple of dives on one of my trips.
A Learning Itinerary
Having the freedom to learn underwater photography at your own pace is much easier on a dedicated itinerary. And rather than have a rigid routine where the dive times and durations are fixed, my Red Sea routes are designed to include multiple days and dives spent at specific locations, so you can get in and out the water, when you want, and do the dive you want rather than follow around the guide for a fixed amount of time, which allows you the freedom and time to really get to know your camera and it’s settings.
Add to this that I like to park the boat right on top of the most-productive dive sites, meaning you don’t need to use a RIB so often, which can be a hassle getting in and out of if you’re carrying a camera.
Blurry Contradictions
When we start out in photography we strive to achieve nice sharp, in focus pictures without any obvious signs of motion blur. The technique we’re looking at totally flies in the face of this though. And the whole point is to show some motion in your still pictures, this is not about portraying reality, this is all about creating an impression of speed, by selectively blurring parts of your shots, and exploits two key attributes of your photo equipment. Slow shutter speeds on your camera, combined with the motion freezing potential of your strobe.

Getting Flash
This really needs you to be shooting with a strobe or flashgun, a strobe is a flash, and a flash is a strobe. Don’t be confused this just means a unit that gives out a very brief burst of light, and is not the same as a continuous light source like a video light or powerful torch. And it really needs this super brief, measured in thousandths of a second, burst of light, to work this technique properly, so action cameras like GoPros and similar really can’t be used for this.
You will also need a camera where you can control the shutter speeds, and that has the ability to externally trigger a flash.
By all means contact me on takeiteasyduxy@gmail.com if you’re not sure if your camera can do this, or on my Social Media Channels, Dux Soup Q&A, Take It Easy Duxy, and Duxy Trips Page on Facebook and Instagram.
Why Do This?
At the very least it’s a great way to liven up a duller subject with a dreamy blurry edge which can be used to hide a boring background. I also find a twirl shot in particular gives some circular symmetry to a circular subject.
At best it really can portray a sense of speed in your shots, as variants of the twirl, like shutter dragging, allow you to place a moving subject front and centre, crisply outlined against a blurred and in-motion background.

How Do I Do This?
It’s all about the shutter speed chosen, in combination with motion generated by you, or the motion already contained within the shot itself. You’ll need to pick slower shutter speeds than usual, and it really does depend on the desired outcome. A slow shutter speed between a 1/2 and a 1/30 second will give the most-pronounced effect, with the effect being more pronounced as the shutter speed gets longer.
However, just picking this alone isn’t enough to deliver the required end result. You’ll have to move the camera in a circular motion at the same time as you’re taking the shot. I find that lining up on the subject, and framing how I want first, and then making about a quarter turn or less, while I press the trigger, will deliver the end result.
I wish I could guarantee that it’ll work first time, and every time, there’s a random aspect to this, but it’ll get easier the more you practice it.
The shutter speed is just one half of the equation, your flash is going to be providing all the foreground light. And because a strobe or flash is actually firing at a very fast speed itself, as previously mentioned, in tiny fractions of a second, this will freeze anything illuminated by it in the foreground of your picture.
And if all goes well, the blurry part will be the background of your shot, with the main subject sharp but surrounded by circular motion blur.
Enigmatic Variations
If you’ve figured this out correctly, you’ll have realised that it’s your circular motion that is causing the background blur, and how much or little you turn, combined with the shutter speed chosen will decide what the background looks like.
So it follows that whatever movement you make will create a similar pattern in the background, and you’re not limited to just a circular movement.
Side to side, or as one of my good friends does with amazing results, a Nike ‘Swoosh’ tick pattern that he does for the motion bit, all of this will be echoed in the impressionistic pattern of your backgrounds.
A Synching Feeling
If you’ve explored the flash settings on your camera, you may well have noticed a setting called 1st and 2nd Curtain synchronisation. This means the point at which the shutter triggers the flash to be fired. How this effects the shot, is all to do with the blurring while the shutter is open.
If the flash is triggered when the shutter starts its movement, at the beginning of the shot in 1st curtain synch, will mean that any secondary blurring after the flash has fired will be recorded after the flash. If instead you decide to switch the camera into 2nd curtain synch, then the flash will fire after the shutter has moved, at the very end of the shot.
So you now have a way to define if the blurring is in front of or behind the subject movement.
This doesn’t have a great deal of impact on a straightforward twirl shot, as the movement is a circular one and the blurring has little beginning or end. However, it has a big effect on the sort of shot where you stay still and the subject is moving. As any blurring is better if it is behind the subject’s direction of movement, this makes for a more logical and visual sense of movement.
So for shots where you want to show the fish movement, like in my shot of the stern of the Thistlegorm, with the burst of fusiliers around, then you stay still, letting the fish do the moving for you. Then second curtain synchronisation is the setting too use.
In all honesty, as it’s something I may forget to change in the heat of the moment, I set my camera to 2nd Curtain synchronisation by default.


Final Thoughts
These motion-blurring techniques are predominantly for shooting with wide-angle lenses. Time of day can be quite important too, because if you’re shooting with slower shutter speeds, the amount of ambient light will dictate just how low you can go, ie if it’s very bright and in the middle of the day, you may find that even if you’re shooting with very small apertures on your lens, at the lowest ISOs then the exposure triangle won’t always allow you to pick the lower speeds.
So I find these techniques work better when the ambient light is already low, either at dusk or dawn, which can give you more flexibility. This will also have the welcome benefit of allowing you more range with your flash, opening up distances further than under a metre away, as you’ll not have to be limited to the range-reducing smaller apertures.
As I said early on though, this will all become much clearer to you when you get a better understanding of the exposure triangle.
And if you’re really struggling to pin down this technique, if you can’t make it then you can always fake it, using subject selection techniques and selective motion blur in Adobe Photoshop, you can make a pretty convincing imitation of this.
Whether or not you want to learn this in camera or cheat, this is something I can easily teach you on one of my Photo Editing workshops, or overseas trips. Although I do think it’s better to learn how to do this properly like most things in life. You should have fun trying though, and persevere, it will pay off in the end.
Duxy Escorted Trips
A great way to learn how to use new kit and develop your skills is on a dedicated trip. My escorted trips are for all and if you have a GoPro or compact, I can improve your skills and realise your full potential in an easy-going, relaxed environment. If you’re a more-experienced shooter, my itineraries and locations are carefully picked to be very photographically productive.
Duxy will be leading a Red Sea liveaboard in 2023 – book now.
Biography
Since returning from Egypt working as a guide in the early noughties, Duxy has been at the forefront of underwater photography technology and how it has changed the way we all now take underwater photographs.
Working as sales manager for the two leading underwater photography
retailers, and more lately as the photography travel specialist for a multi-award-winning dive travel agent, his light-hearted take on the iving world and underwater photography has resulted in him being a regular speaker at the Dive Shows and at clubs up and down the country, sharing his knowledge and experience with all levels and abilities of underwater photographer.
He likes nothing better than to get a beginner started on the route to rewarding pictures, and approaches the subject with an inclusive, rather than exclusive, manner. He now has more than 40 escorted trips under his belt and is continuing to develop new ways to pass on the knowledge and share the love. He can be found on Instagram and Twitter as @takeiteasyduxy and Facebook as Take iT Easy.
Photographs by Paul ‘Duxy’ Duxfield