Walt Stearns discusses how to combine sun and flash for a more-dynamic picture.
Photography by Walt Stearns.
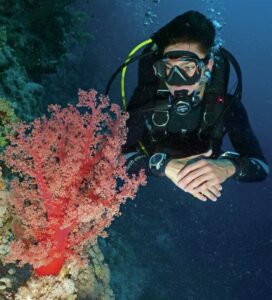
Having the blues is not necessarily a bad thing when it comes to underwater photography. As underwater photographers, we covet the ideal conditions needed to shoot stunning wide-angle images. It begins with excellent water clarity and ample sunlight that gives the ocean a bright vivid blue cast.
Next comes attention-getting subject matter – which could be a giant manta ray passing over head, a diver exploring a wreck, a sea turtle or shark gliding down a wall, and so on. Whatever the subject matter that will become the focal point of the picture, you’ll want to add appropriate lighting to ensure it is properly illuminated in the foreground. But then there’s one more step you’ll need to take to capture that enticing shade of blue in the background that adds the final touch to an iconic image.
Achieving that level of symmetry between sun and strobe is an art form that many talented underwater photographers out there have worked diligently to master.
Painting with light

The word photography comes from the Greek words ‘photos’, meaning light, and ‘graphos’, to draw, sketch or paint. In a manner of speaking, the sensor in our camera is our canvas, while the camera’s three primary variables – ISO, aperture and shutter speed – serve as our painting utensils. The palette we use to manipulate these three variables to create a desired result is known as the Exposure Triangle.
As we all know, longer shutter speeds blur motion, shorter speeds work towards freezing; smaller apertures increase depth of focus; and ISO dampens or amplifies the camera’s sensor sensitivity to light.
In macro photography, the three variables of the Exposure Triangle are devoted almost entirely to optimizing the light provided by a flash. Given that burst of illumination from an underwater flash lasts approximately 1/1,000th of a second, the contribution to the exposure provided by the flash will be the same regardless of whether the shutter speed is slow or fast. The reason to select faster shutter speeds at, or slightly slower than, the camera’s top sync speed is to cancel out whatever amount of ambient light might be present.
With natural light removed from the equation, the photographer’s attention turns to the power settings controlling the output of the flash and the lens’s aperture value. To achieve the greatest degree of focus detail and resolution in most macro lens requires an aperture value between f/19 and f/32. Camera ISO settings are seldom an issue in macro work, as it’s common to work in the 100 to 200 ISO range. By contrast, outdoor landscape and nature photographers work the Exposure Triangle differently, placing a greater emphasis on the camera’s ISO, aperture and shutter speed, with settings based on the much greater availability of ambient sun light.
Exposure Triangle vs the Exposure Diamond In the sphere of wide-angle underwater photography, the classic Exposure Triangle becomes inadequate as it is not suited for factoring in the elements of both flash and sun concurrently. To do this requires a different methodology utilizing a more-adaptive model favored among studio photographers. It’s called an Exposure Diamond.
Some illustrations show it as two adjoining triangles, or a square positioned like a diamond with ISO, Aperture, Shutter Speed and Flash represented at its four principal foundations. The version I prefer places Aperture opposite to ISO and Flash Power Settings opposite to Shutter Speed.
In a way, the exposure diamond is a slide rule of sorts The Aperture side describes the valves for light passing through the optical elements of the lens to the sensor, which is dictated by the lens’s iris without regard for the source or sources of this light. As mentioned earlier, changes to Aperture – topping down or opening up – result in a quantifiable shift in the optics depth of field.
On the flip side, camera ISO can be adjusted to compensate for Aperture shifts by increasing or decreasing the camera sensor’s sensitivity to light. The trade off in raising the sensor’s sensitivity to light amplifies presence of noise, lowering sensitivity dampens the presence of noise.
Excluding high-speed sync, shutter speed has basically no effect on the exposure of foreground subjects created by the flash. When shooting wide-angle, shifting between shutter speeds of 1/60 (going slower increases risk of motion blur) and 1/200 to 1/250 (the limit that most cameras can go for syncing with a flash) will only have negligible effect on the exposure of foreground subjects.
Each increase or decrease to one of these variables will generally require some amount of change to the other. The Flash + Ambient Light = Exposure formulae represents that balance between flash’s role in illuminating the subject(s) in the foreground while at the same time providing enough ambient light to properly illuminate the background for a more-dynamic affect.
As a side note: Setting your camera camera’s functions in Aperture Priority (A or AV) is ill-advised as this setting dictates all aspects of the exposure based on where the aperture is placed, leaving the camera to determine the proper shutter speed, and in some cases ISO as well.
The downside of giving the camera this control is the risk of that shutter speed exceeding the sync speed allowed for a flash or fall too slow rendering unexpected motion blur. Program Mode (P) is even worse in that while you have ISO control, you will have none for aperture and shutter speed. This the reason why shooting manually is the best way to achieve high-quality underwater images.
Bringing it all into play

Borrowing the motto ‘Plan your dive, dive your plan’, underwater shooters should predetermine camera setting based on the parameters of the dive, including depth, location, water conditions and subject matter.
With wide-angle, my preferred range for f-stops is f/8 to f/11, which will provide a very generous depth of field. Even at f/5.6 I will still have a liberal amount depth of field to keep most everything in focus in the foreground.
The point I need to make here is rather than getting overly fixated with depth of field, place more emphasis on that lenses’ ability to generate the appearance of Dimensional Depth.
Not to be confused with depth of field – the range of what is in focus and what is not – Dimensional Depth is more about how a wide-angle scenic is interpreted. Dimensional Depth is a phenomenon created by the optical nature of a wide-angle lens – and especially super wide rectilinear and fisheyes lenses – which create a forced perspective that makes everything in the image appear farther away than it was. This same trait will even fool the viewer into believing the water clarity in the image is better than it was at the time.
What I often refer to as the ‘Great Wide Lie.’
Personal experience has shown that the best way to create a comfortable amount of wiggle room to work my aperture values up and down involves finding the most suitable ISO setting for the situation. For example, when ambient light is strong (bright sunny day, depth is less than 60ft, white sand bottom, etc), 200 ISO is a good place to start if you can stick your shutter speed at 1/125 to 1/180 of second and f-stop at f/8 or even f/11.
When there is less ambient light (overcast sky, deeper working depth, underwater visibility not great, dark bottom, etc.), stepping up the gain on the camera’s sensor to 400 ISO is a good way to retain your desired aperture and shutter values. I know that in these situations shutter speed plays a greater role in controlling motion than it does for controlling light in an exposure. So, incorporating 1/125 of second as my base shutter speed allows me to concentrate on the aperture.
Once underwater, I begin by confirming that all the variables determined pre-dive are in the right range. I will take a few meter readings from various zones in the water column. My current camera, a Nikon D850, like most digital SLR and mirrorless cameras, has three primary metering modes to choose from: matrix (evaluative), center-weighted, and spot. Between the three I prefer center-weighted metering as it takes in the central 20-30% portion of the frame, thereby providing greater accuracy when determining the amount of ambient light that is present up and down the water column.
As part of this exercise, I will make mental notes of my surroundings, include where the sun is positioned, whether it is sunny or overcast, and whether the bottom is dark or bright. Like Goldie Locks, your aim is to determine the ‘just right’ aperture zone needed to capture the perfect level of ambient light.
Accentuate, not annihilate

After calculating which aperture and ISO settings balance out the best, your attention can then turn to how much fill flash will be needed for the shot.
The bulk of underwater strobes currently available for wide-angle applications feature a GN between 22 and 33. Some manufacturers like Retra present their ratings in Watt-seconds of 100W and 150W, which workout about the same. A GN rating of 22 on one of these strobes is generally based on an ISO of 100. The number 22 signifies the amount of illumination it can generate to achieve an exposure at f/22 of something three feet away. Double the distance, the same exposure is cut nearly in half to around f/11. Triple the distance to nine feet, realistically you might get it around f/5.6 maybe f/6.3.
This exponential drop in illumination is attributed to the fact that water is 800 times denser than air and may contain light-robbing particulate in the form plankton and/or dust. Even when blessed with 100-foot visibility you are still shooting through a medium of fog.
More times than not, a given flash’s primary role in wide angle underwater photography is to illuminate the subject in such a way so that the brighter colors present are brought out without revealing where that source of light came from.
To achieve that more natural look with my lighting I tend to stay clear of using TTL, as I have found its metering system to be highly problematic in differentiating between the light from the strobe hitting the subject in the foreground and the ambient light in the background. If the background is very bright, the sensor can get fooled into thinking there was enough light emanated from the strobe to cut it off prematurely.
A common result is an exposure coming out flat, lacking color and detail with the background blown out. In contrast, shooting in TTL mode at depths where ambient light is less pronounced creates the opposite effect, as the metering only registers the light coming back off the foreground subject immediately in front of the lens while ignoring the light present in the background.
Placing the strobes in a manual mode puts all control in your hands so that you decide how little to how much light is required.
Most underwater strobes suited for wide-angle provide full, 1/2 and 1/25 power in manual mode. Unless you are shooting into the sun to illuminate a subject that is directly backlit, you are probably not going need to full power. In most cases, between 1/2 up to 3/4 power does the job.
As with any process, there will be a certain amount of trial and error to develop a feel as to how much is needed to power up or down.
The most-wonderful thing about digital photography is that you can take a test shot or two and bring it up instantly on your camera’s LCD to establish whether the exposure just made is coming out with too much or too little fill flash.
To summarize, when the sea is blue, show it in your pictures. Till the next column, happy shooting!
Pushing the envelope

You know the truism; ‘you can’t always get what you want’. With any aspect of outdoor nature photography, there will be instances when environmental conditions are not ideal, leaving you to deal with the hand you’ve been dealt.
One of those days took place during a trip to the Riviera Maya region of Mexico, where I had only one day reserved to dive Cenote Angelita.
What makes Cenote Angelita interesting is that it is a circular well-like sink hole that bottoms out around 180ft deep. The feature this cenote is known for is a thick layer of hydrogen sulfide at the 100ft mark. A large breakdown pile topped with a jumbled cluster of large tree trunks and limbs rises above this layer to create the illusion of an island surrounded by dense fog. One problem I faced that day was that the sky was extremely overcast, which reduced ambient light levels to almost nothing. I wanted to capture a diver hovering over the breakdown pile while at the same time show both the hydrogen sulfide at the bottom with some hint of sunlight coming from above. This meant the ISO needed to be exceedingly high.
Raising the ISO on my Nikon D500 to 2000 ISO, while at the same time dropping the shutter speed down to 1/60 provided me a working f/4.8 on a Nikon 8-15 fisheye lens. Even with an aperture that wide open, this fisheye lens still has surprisingly good depth of field. The primary role of my strobes in this equation (a pair of Sea & Sea YS-250s) was to provide a little bit of fill on the jumbled branches on the side Shot with Nikon D500 camera, Nikon 8-15mm fisheye lens with two Sea & Sea YS-250 strobes with the following settings: ISO 2000, Shutter Speed 1/60 of a second, Aperture f/4.8, strobes manually set at ¼ power.
of the breakdown pile closest to me. Going that high on the ISO proved something else to me: this whole notion about being afraid of sensor noise in an image is a bit overrated.
Yes, the risk of using high ISO can lead to some visual distortion defined as graininess in an image due to the lack of light. And yes, there was some noise in the more shadowing areas of the shot, but nothing a little noise reduction in post could not handle. But here you have it. Cenote Angelita with all the elements; sunlight light filtering down from above illuminating the white cloud hydrogen sulfide below as a diver hovers with the illuminating beam of his handheld light.
This article was originally published in Scuba Diver North America #14.
Subscribe digitally and read more great stories like this from anywhere in the world in a mobile-friendly format. Link to the article.