This issue, our panel of experts discusses working with models, and explain how to make maximum impact from having a diver in your photographs
Photographs by Martyn Guess, Mario Vitalini and Paul Duxfield
MARTYN GUESS
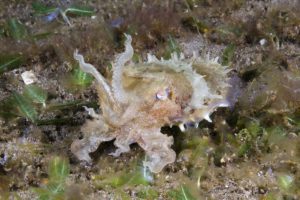
There are certain underwater images which need a model – a diver in the frame, in order to give the image more impact. A model can add perspective and help with scale, as the human form is instantly recognisable and it is therefore easier to judge how big something is – for example, a wreck or a section of a wreck, with a diver in the picture.


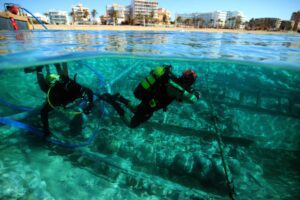
A diver in the shot helps to tell a story and can make for a much-more-interesting image. A diver in a cave, for example, will help with a sense of exploration.
A diver can add human interest and the viewer will often relate to the scene – on the basis that they have been there or somewhere similar.
A diver looking at a specific subject can add a lot to the image as it will lead the viewer’s eyes into the subject and, if well placed in the image, can assist with the overall composition.
I use models in this way a lot. To get the best out of your model though, they need to understand what you are after and also how they will look in the image.
Firstly, you need to rehearse with your model how you are going to communicate underwater and create signals that you both understand. Making a circular motion with your hand or finger indicates that you would like her/him to go around again and repeat the swim-through, for example.
My wife has her own hand/finger signals in response, when I ask her to go back and repeat too many times, particularly in a current! Using your forearm and fist to indicate how you want the model’s body position to be angled – the fist representing the head, works well.
Tapping your mask lens with two fingers and then pointing in the direction you want them to look helps the model to understand where they should be looking. You don’t just want the model staring straight back at you, as this will not look very natural.
I hold my hand up with palm towards the model and push back, if I want them further away, or I draw them in by beckoning them with my hand. Pushing my fingers away from my regulator and rubbing by thumb and fingers indicates that I would like my model to breath out and expel bubbles, which looks good when the diver is in the distance.
You, the photographer, have to decide, how you want the model to appear in the image and then organise yourself in terms of your position, and then also the model’s position, to suit what you are after. The model is not going to second guess what you are after.
Something that I do quite a bit is to take a picture of the scene and then show the model the LCD and point to where I want them to be within the frame. If during shooting it isn’t working, show them the picture and again point to where you want them.
It makes things so much easier for the model to understand. If you are after a specific shot, discuss it before you get into the water and there will be a far better understanding when you start taking your images.
Something which also works well is the fact that the model can often see their reflection in the dome port, bearing in mind with wide-angle photography you are actually very close to the subject. They can then place themselves in better positions, rather like looking in a mirror.
The model has to have good buoyancy and look natural in his or her pose, with hands clasped together and legs together. You won’t believe how awful diver images look if the legs are wide open – again, it doesn’t look natural.
Inexperienced models don’t feel comfortable posing and tend to just hang in the water staring at the camera, so it is worth talking through things on dry land and explaining that swimming through a scene naturally and looking ahead will work far better than just hanging in the water.
By the nature of swimming through the scene, their body position will be much better and hopefully horizontal. With inexperienced models I tend to have them further into the distance rather than close up where the body position and eye direction is more critical.
It is important that the model makes sure that their equipment is properly attached, such as air gauges and octopus, as otherwise they can be very distracting in an image. Think about what the diver looks like for the image you have in mind. Long hair looks better with a hair band rather than floating around. You can if you intend to take model images seriously go as far as brightly coloured masks, hair bands, wet suits and fins, all of which help to make a model stand out.
Try using a model in your shots, but remember communication is the name of the game!
PAUL DUXFIELD
I personally find having a diver, snorkeller, or often swimmer in my wide-angle underwater shots a vital component of a good communicative composition.
Okay, let’s explore a little of what I mean of a ‘communicative composition’. Simply put it’s a shot that conveys a mood or impression, that can be seductive to the viewer by trying to imply that they could be the one in shot in this beautiful location.


It sells the idea of scuba diving being an aspirational endeavour and I like to try and make this look like it’s more of an inclusive recreation than something that’s only available to the privileged few.
It’s a tricky balancing act as while you want to make it look like a lovely warm comfortable experience that is safe and relatively straightforward, you also want to have a thread of excitement running through the shot that is anything but the norm of sitting on a sofa and living life vicariously.
You want to make people want to be there, and so what better way than to use a fellow diver in your pictures, either with or without their active participation.
Most of the time, I am escorting a photo-style trip so I don’t like asking too much of my fellow divers, so I practice inadvertent modelling. I’m familiar, particularly at most of the Red Sea sites I visit, of the lay of the land, so I will have a shot in mind where the composition will be made by the inclusion of a diver, usually silhouetted in the blue section of the frame, and fairly small in shot.
So I will frame up sans diver and simply wait for an opportune moment for a diver to swim into shot, and fire away. Usually a couple of shots are needed to ensure that they’re looking good, isolated from the background and not breaking the edge of the shot. Great if it’s one of your group, but to be honest for these type of shots, the diver is usually unrecognisable and it really doesn’t matter who it is.
If you're diving with a regular buddy, maybe communicate your intentions pre-dive, and visualise a shot you may like to achieve and come up with a set of signals that work for you both, communicating things like, up a bit, down a bit, etc, or if you’d like them to switch on a torch, or tuck their arms in, or keep their legs straight. Of course, it’s only courteous to return the favour if you’re both taking pictures.
A whole other type of diver shot is where the diver is the main component of the picture and not just there to lend scale. So I’d suggest that you try and get some sort of eye contact as it will engage the viewer more.
If the background is uninspiring or I only want to concentrate the viewer’s attention on the subject, I will often delve into the bag of tricks and use a spin, pan or twirl shot to emphasise what I'm wanting to get across.
Because of the nature of my trips I am often photographing other divers with a view to using them to show a specific photo technique or positioning in the water. Rest assured, though, if you find me blowing bubbles and snapping away within close proximity of your good self, it’s because I am thinking you’re looking good, well-trimmed and exercising conscientious buoyancy control.
At the end of the day, including divers in your shots makes a human connection with the viewer, and is a great way to convince our non-diving brethren that it’s a great accessible hobby we all indulge in.
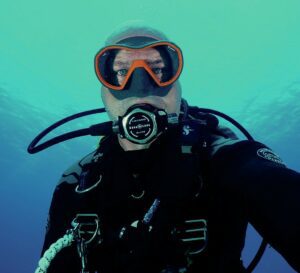
MARIO VITALINI
As underwater photographers we are always on the look for exciting new subjects and often overlook our fellow divers as an important element in a picture. A diver in a photo can help to give a sense of scale, and adds a human touch, usually making the image more interesting. You can take two approaches to using models underwater.


The first one is opportunistic. Simply look for the right diver in the right position. No preparation or pre-planning needed. It can yield some good results, especially when you are placing a diver in the background as a compositional element to balance an image.
However, is not very efficient when the diver is an important part of your picture. And you should always ask fellow divers for permission before taking their pic.
The second approach involves more preparation. First of all, you need to find someone willing to pose for your pictures. An experienced diver will give you better results, as his or her position will be much more relaxed.
It is fairly obvious to state that communication underwater is fairly compromised, so is essential to agree on a set of signals that allow you to guide the model into the right position.
Once you have found the right location, take a test shot and show it to the model indicating where you want him/her to be positioned. The model can also use their reflection on your dome-port to get in the right place.
Where you position the diver can make a big difference in the general look of the picture, you can use the model to balance a shot or to add a focal point. Ensure there is good separation between the diver and the environment such a reef wall, cave or a wreck.
If you are planning to create a silhouette make sure the diver is not swimming directly into the camera otherwise they become a shapeless blob. Instead they should be on an angle, preferably with the head slightly higher than the feet.
Pay special attention to the arms and legs avoiding flapping limbs at all cost, they make for very messy images. Arms straight in front do not look good in pictures. Asking the model to hold a light with two hands at chest level and to keep the legs straight or just slightly bent to gives the arms a much more relaxed feeling.
When your model is relatively close the face becomes a very dominant feature. For this reason, you need to pay special attention to the eyes. With most subjects it is important to achieve a strong eye contact.
But when photographing divers, this is a rule that should be immediately discarded unless you want to go for a comedy approach. When a diver looks into the camera, the image gets an unsettling feeling. The best thing is to have a subject and direct the diver to look at it. The line of sight will guide the viewer to the subject.
If you have the possibility to select what kit is your model going to wear, choose classic fins with a traditional shape. There are many models with unusual shapes. These can be very good pieces of kit, but they do not look great in photos.
Selecting a good mask is also important. Some models make people look a bit boss-eyed and dark or black skirts will make evenly lighting the face of the diver very difficult.
Using divers in your images can make for great shot. It does not matter if you have a regular dive buddy, but spend some time before the dive to discuss with your model what to do when the next photo opportunity comes along. Visit the Scuba Travel Website.